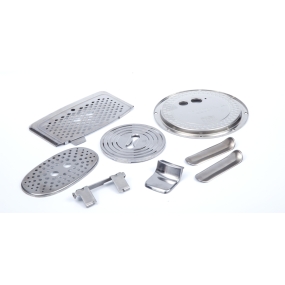
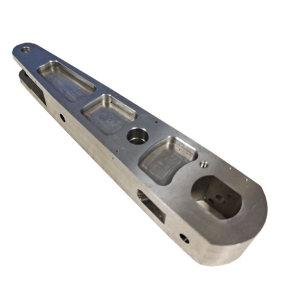
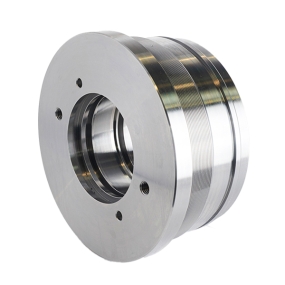
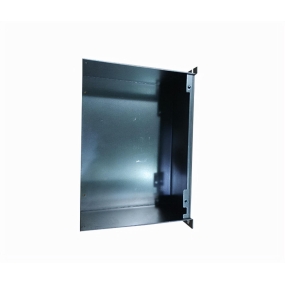
Sheet Metal Processing is a comprehensive cold working process for metal sheets (usually below 6mm), including shearing, punching, bending, welding, riveting, mold forming, and surface treatment. Pronuntior eius est, quod densitudo eiusdem partem consistentia est.
Metodo metalla processamenti folii: Non mold processing: The process of sheet metal processing through equipment such as numerical punching, laser cutting, shearing machines, bending machines, riveting machines, etc. It is generally used for sample production or small batch production, with high costs. Circula cursa processionis et responsa rapida. Mold processing: Using fixed molds to process sheet metal, there are generally cutting molds and forming molds, mainly used for mass production with lower costs. The initial mold cost is high, and the quality of the parts is guaranteed. Ciklus processionis primus longus est et costa mollis alta est. Processus metallis lapides: cutting: numerical punching, laser cutting, shearing machine
Forming - bending, stretching, punching: bending machines, punching machines, etc
Other processing: riveting, tapping, etc
The connection method of sheet metal
Meditura superficie: pulverem effusionem, electroplating, trabem trabem, printing ecc.
Sheet metal processing technology - The main cutting methods for sheet metal include numerical punching, laser cutting, shearing machines, and mold cutting. CNC is currently a commonly used method, and laser cutting is mostly used in the sampling stage (or can also process stainless steel sheet metal parts), with high processing costs. Mold cutting is mostly used for large-scale processing.
Below, we will mainly introduce the cutting of sheet metal using numerical punching
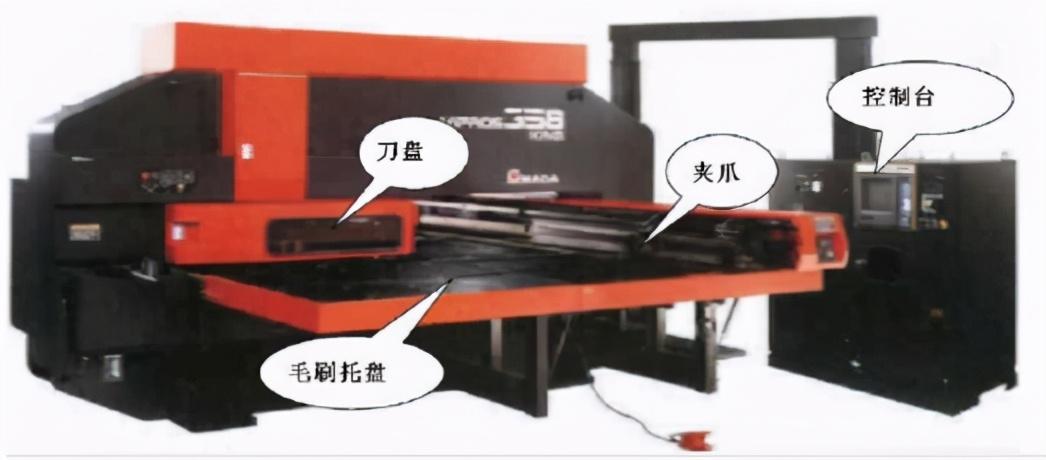
Numerical punching, also known as turret CNC punching machine, can be used for cutting, punching, stretching holes, rolling ribs, punching blinds, etc. Its machining accuracy can reach+/-0.1mm.
Densita metallis CNC machinabilis est:
Places frigidas et calidades 4.0mm
Plata Aluminium 5.0mm
Plata steela sterilis 2.0mm
There is a minimum size requirement for punching. Minimum magnitudo puncti relatus est ad formam foris, proprietates mecanica materiae, et densitatem materiae. (As shown in the figure below) 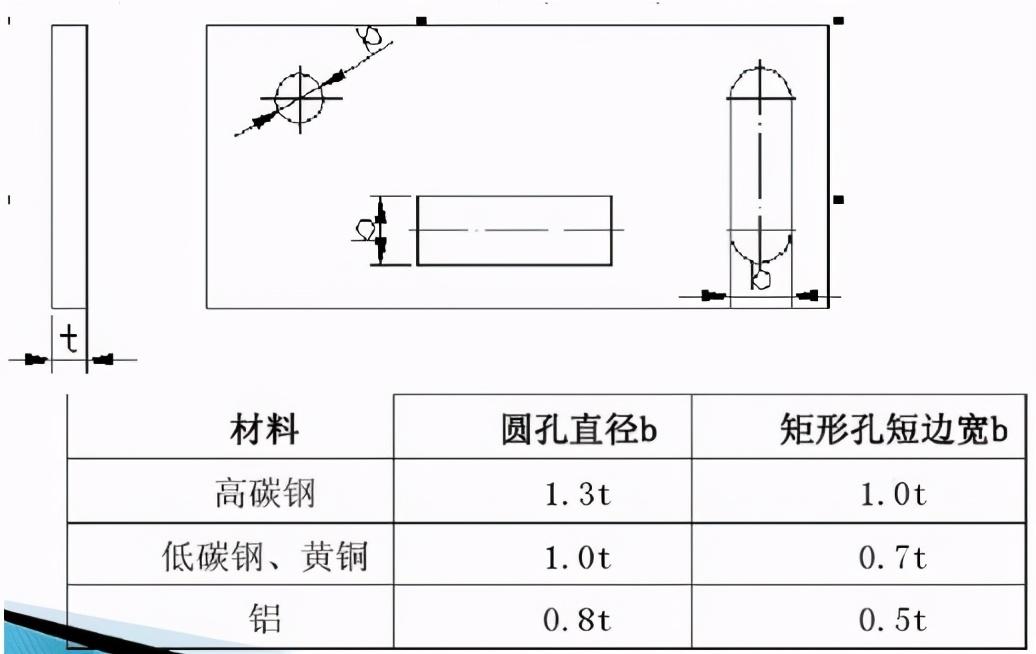
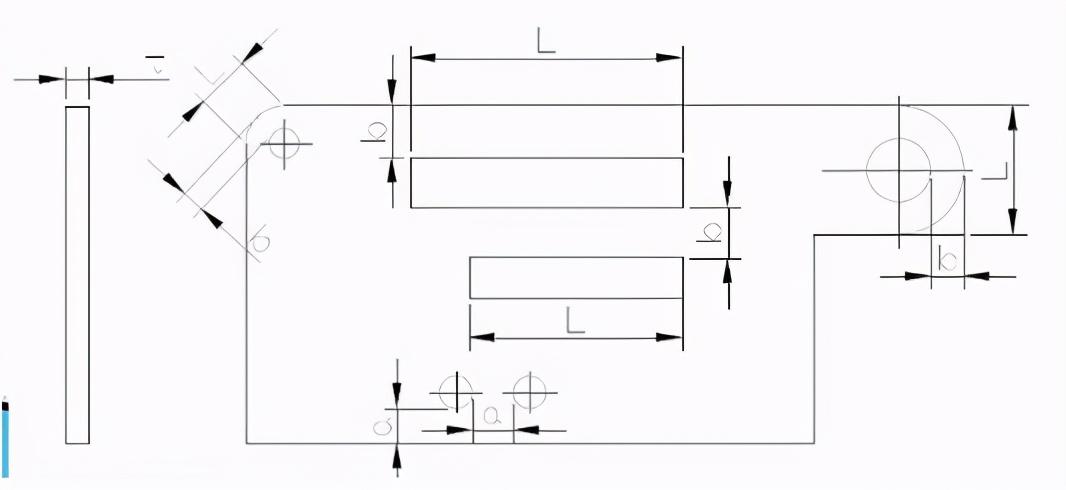
2. Distancia spatiae et extremis rotarum puncti. Quando minima distancia inter angulum punctionis part is et exterior angulum partis non est parallel exterior anguli partis non est minima distancia minima quam densitate materiae t Quando paralelus, non minus quam 1,5t esse. (As shown in the figure below)
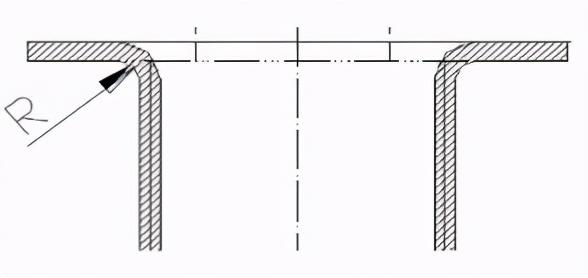
3. When stretching holes, the minimum distance between the stretching hole and the edge is 3T, the minimum distance between two stretching holes is 6T, and the minimum safe distance between the stretching hole and the bending edge (inside) is 3T+R (T is the sheet metal thickness, R is the bending fillet)
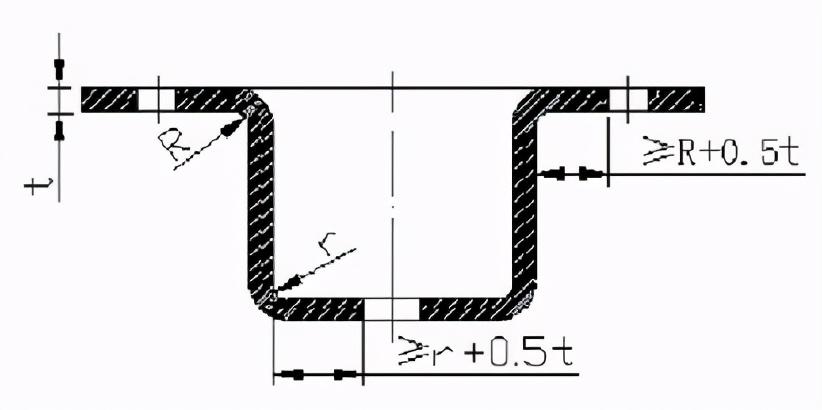
4. Cum percusserunt holocaustos in lateribus et fixerunt partes profundis, distancia est inter murum foraminis et murum rectum. (As shown in the figure below)
Sheet metal processing technology - Forming sheet metal mainly involves bending and stretching the sheet metal.
1. Sheet metal bending 1.1 Sheet metal bending mainly uses bending machines.
Precisio machinae machinae folding;
Unfold:+/-0.1mm
Half Fold:+/-0.2mm
Vix 20% discount:+/-0.3mm
Principulus principis ferentiae sequentiae processionis ex intrinsecus et ex parvo usque ad magnum est. Formae speciae primum benditur, et praecessimus processus non efficiat aut interficiat cum subsequentibus proceduris post formandum.
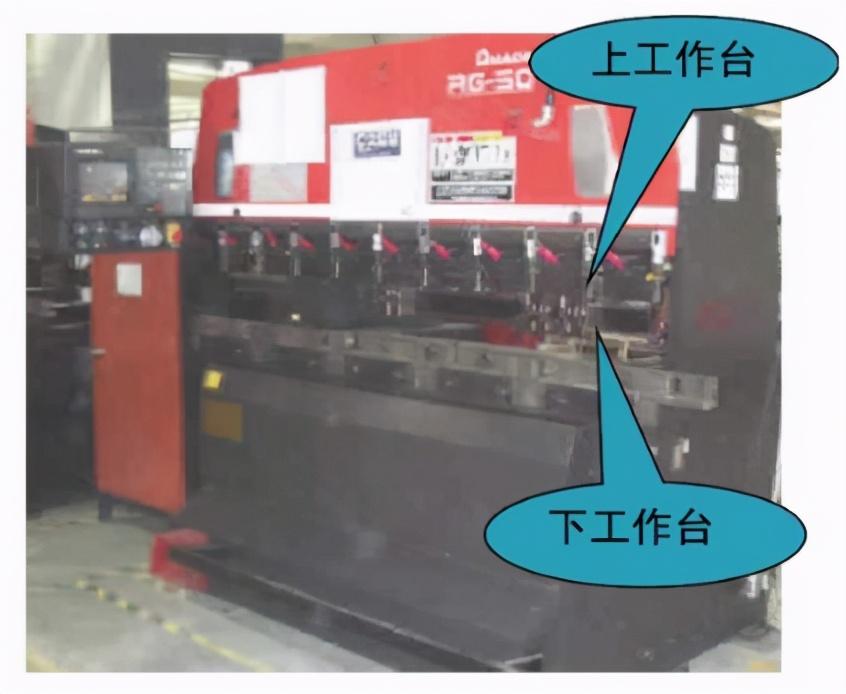
1.3 Formae cultris ferentes convenientes:
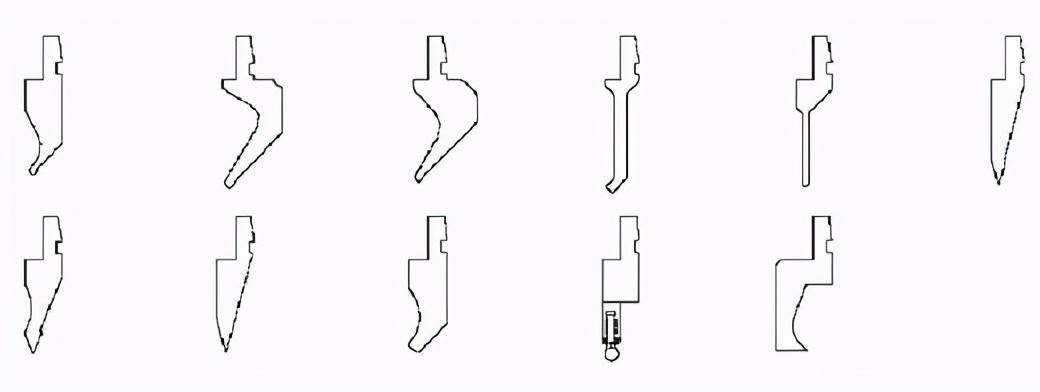
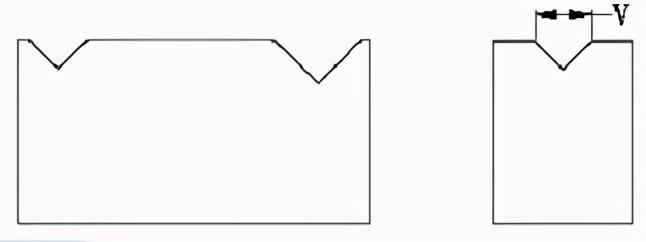
Forma V-groove communa:
1.4 Minimum bending radius of bent parts:
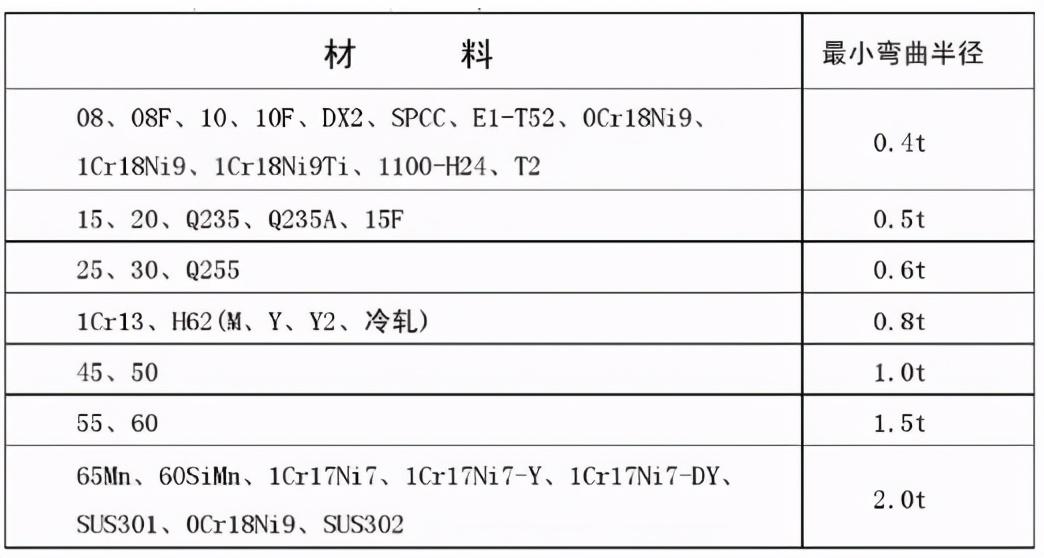
When the material is bent, the external layer is stretched and the inner layer is compressed in the rounded area. Quando densitate materiae constantia est, minima intrinsecus r, magis gravior tensionem et compressionem materiae; When the tensile stress of the external round corner exceeds the ultimate strength of the material, cracks and fractures will occurre. Therefore, the structural design of bent parts should avoid too small bending corner radii rounded. Minimum radius bending of commonly used materials in the company is shown in the table below.
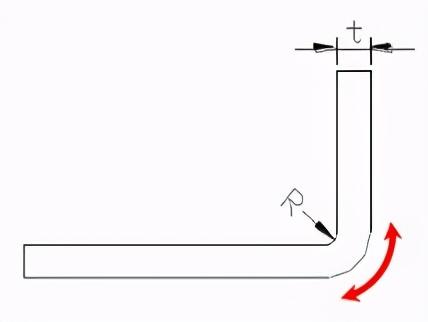
Minimum mensa radius bending for bent parts:
Radius interioris interioris part is et t est murus densitatis materiae
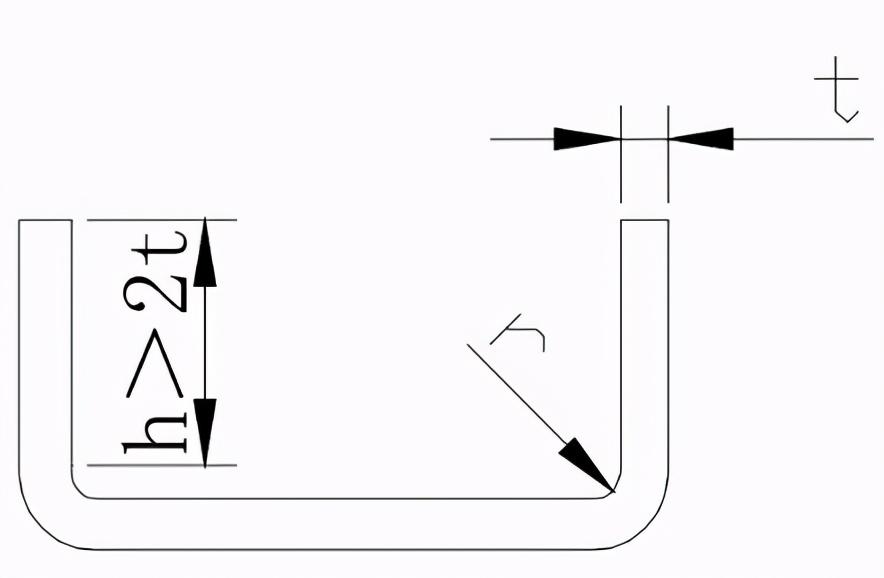
Altitudo anguli rectae part is anguli est 1,5:
In general, minima altitudo recta angulare recta non est nimis parva, et minima altitudo requisita est: h>2t
Si altitudo h2t anguli recta requirit, primum crescere altitudinem anguli, et tunc processere illud ad granditudinem necessarii post crescere. Or, after processing a low grooves in the bending deformation zone, perform bending.
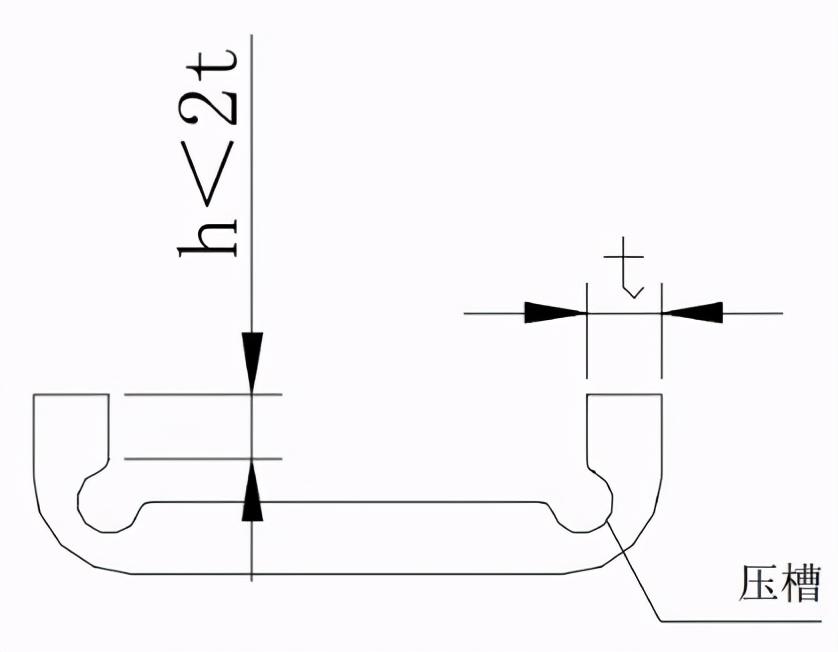
1.6 Minimum altitudinem rotae rectae in angulo oblique in angulo curvato:
When a curvator part with a slanted edge is bent, the minimum height of the side is: h=(2-4) t> 3mm
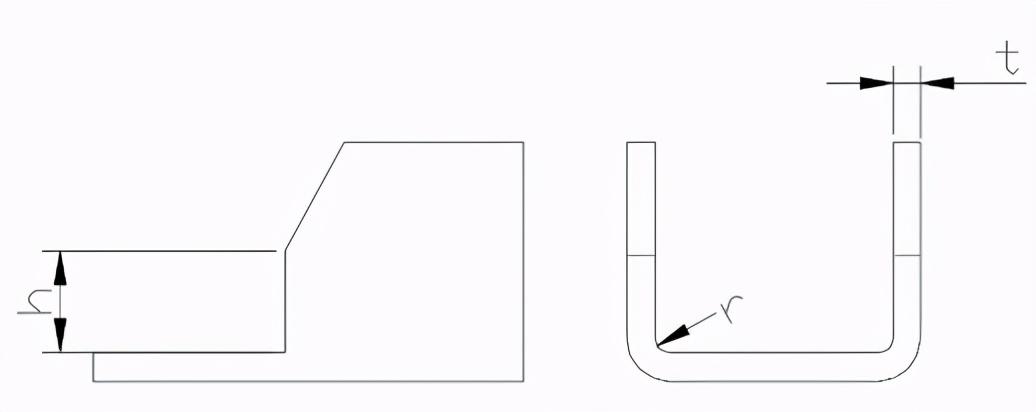
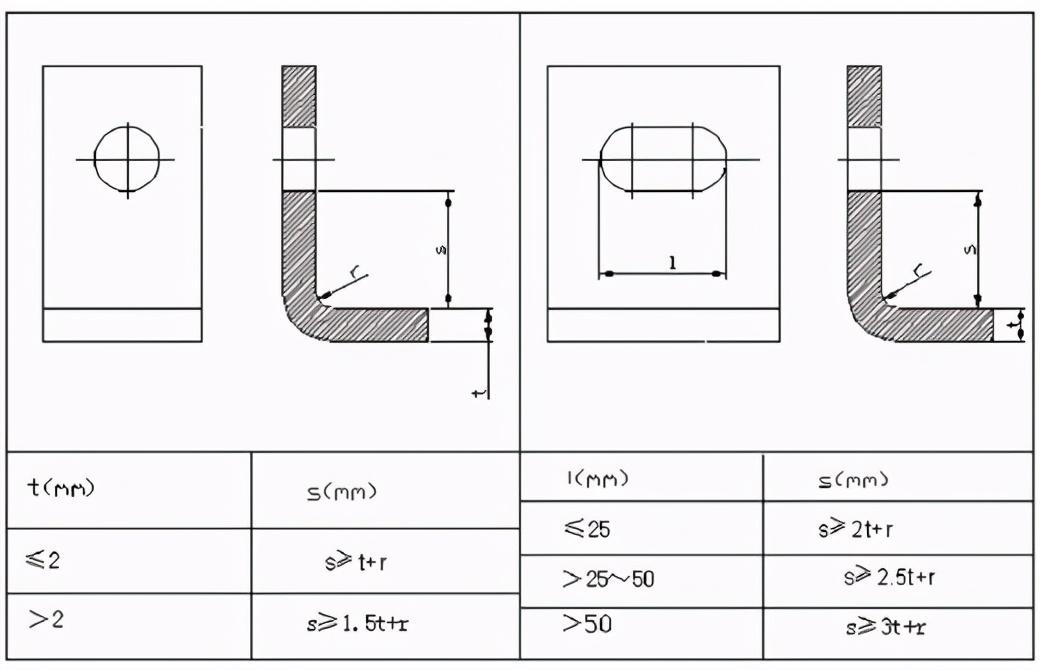
1.7 Distancia rotarum in partes crepidis:
Distancia rotae holae: Punch foras primum et tunc bend illum. Posicio foris terrae deformationis fermenti fuit ut evitat deformationem holae dum crescere. The distance from the hole wall to the curved edge is shown in the table below.
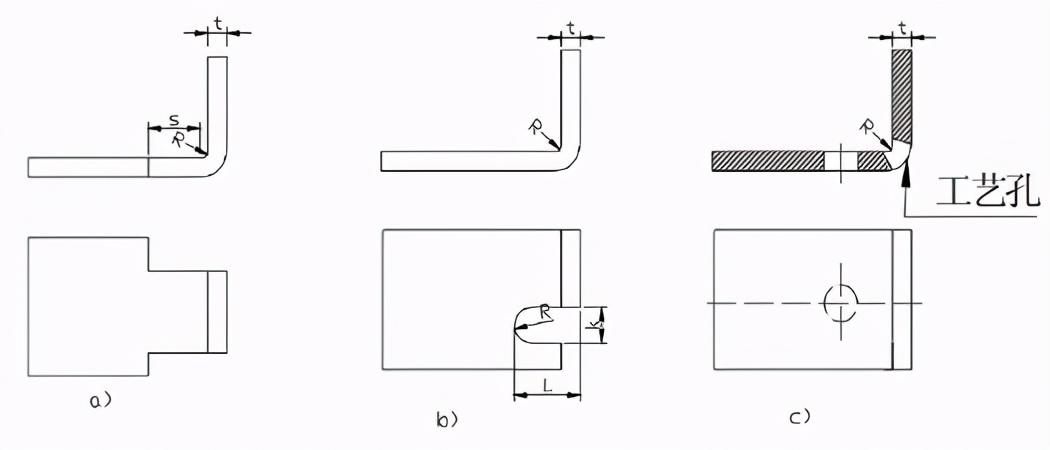
1.8 Processus incision pro loco bending:
Linea benditae partis evadere positionem subito granditudinis mutantur. When bending a certain segment of the edge locally, in order to prevent stress concentration and cracking at sharp corners, the bending curve can be moved a certain distance to leave the sudden change in size (Figure a), or a process groove (Figure b) can be opened, or a process hole can be punched (Figure c). Attention to the size requirements in the diagram: SR; Slot width kt; Slot depth Lt+R+k/2.
1
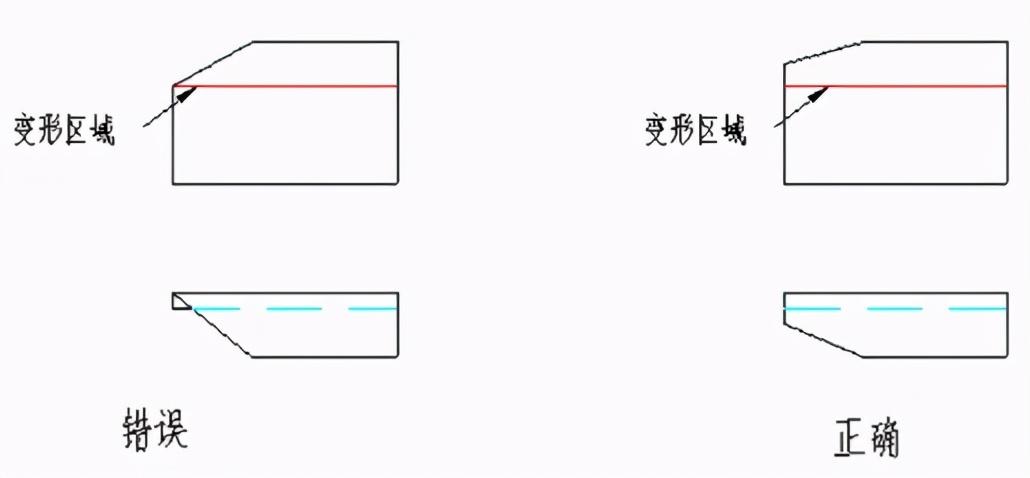
1.10 Design requirements for sheet metal pleats (dead ends):
Longitudo lateris metallorum mortuus est ad densitatem materiae. As shown in the following figure, the minimum length of a dead edge is generally L3.5t+R.
Among them, t is the material wall thickness, and R is the minimum bending radius of the previous process (as shown right in the figure below) before the edge is killed.

1.11 Processus positiones holas additi:
To ensure the accurate positioning of the blank in the mold and prevent the deviation of the blank during bending, process positioning holes should be added in advance during design, as shown in the following figure. Especially for parts that have been bent multiple times, the process holes must be used as the positioning reference to reduce cumulative errors and ensure product quality.
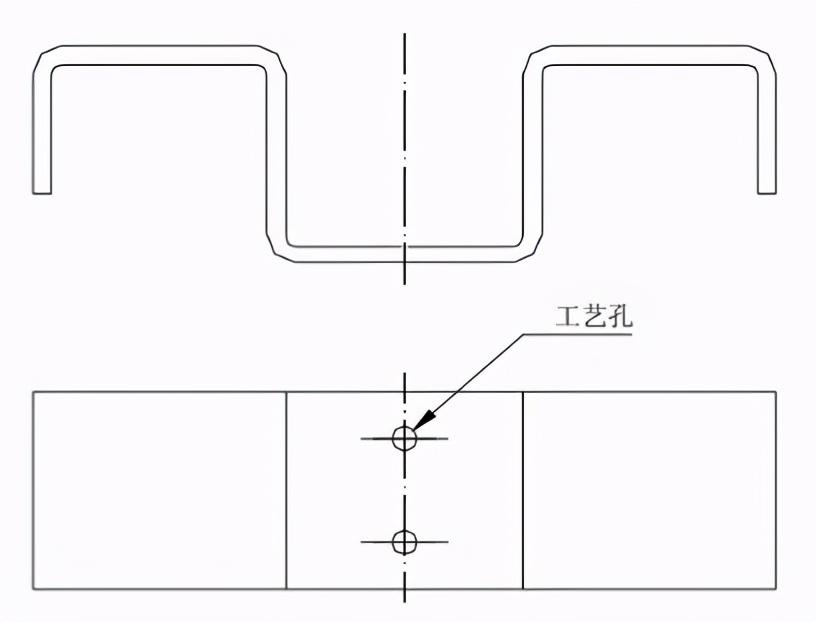
Cum etiqueta est dimensiones partium crepium, consideratione ad processabilitatem dabitur:

Ut in supra figura apparuit a) punctio primo et postea bending, accuractia L dimension is facile est securi, et processio convenit. b) Si alta est requisio precision dimensioni L, oportet primum crescere et tunc processere delictum, quod est difficile procedere.
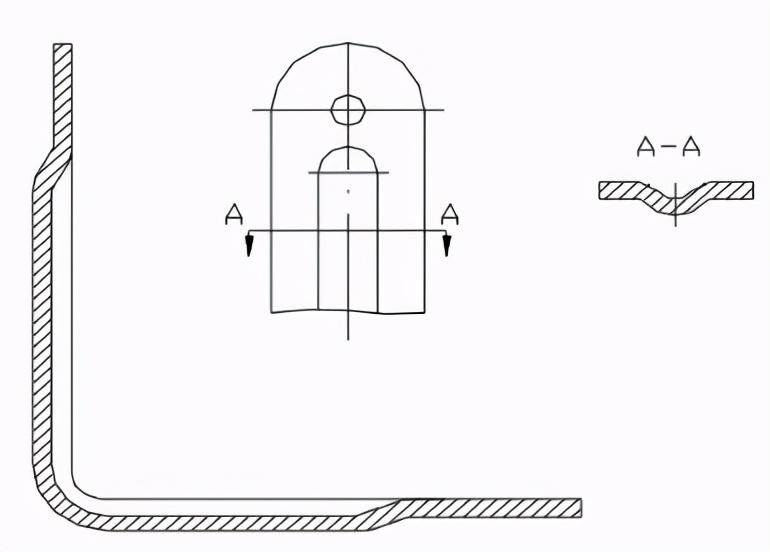
Multae facti sunt, qui influent verticem partium, inclusive proprietates mecanicas materiae, parietem densitatem, radium ferentem, et pressionem positivam in fermento. Magnus ratio radius interioris partis interioris ad altitudinem plateae, maximus reboundum. The method of suppressing rebound from a design perspective, such as the rebound of bent parts, is currently mainly avoided by manufacturers during mold design by taking certain measures. At the same time, improving certain structures in design can reduce the springback angle, as shown in the following figure: pressing reinforcement ribs in the bending area can not only increase the stiffness of the workpiece, but also help suppress springback.
2. Sheet metal stretching The stretching of sheet metal is mainly completed by CNC or conventional punching, requiring various stretching punches or molds.
Forma partis extentis tam simplicis et simetricalis quam possibilis esse, et in uno stretcho quam possibilis formetur.
Parts that require multiple stretches should allow for possible surface marks during the stretching process.
In praecepto assemblationis praecepta permissi sunt extendere latera parietem in aliquid inclinatione.
2.1 Praecepta radius vulnerae inter fundum partis extentum et murum rectum:
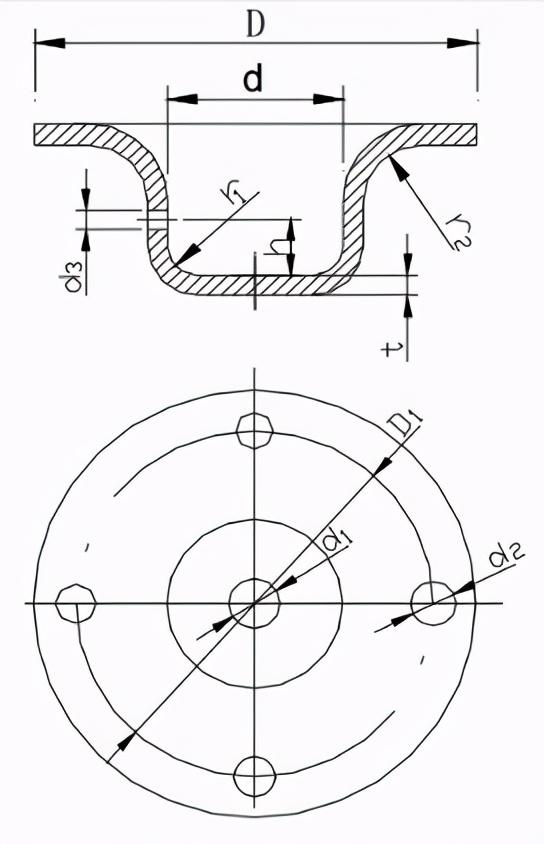
Ut ostendit in imagine subter, radius impletae inter fundum part e e extenti et parietem rectum maior est quam altitudo plateae, i.e. r1t. In order to make the stretching process smoother, r1=(3-5) t is generally taken, and the maximum fillet radius should be less than or equal to 8 times the plate thickness, which is r18t.
2.2 Radius rotunda inter flange et parietem extentum partem
Radius fillet i inter flange e t parietem part is extentis maior est quam duodecim latitudinem plateae, i.e. r22t. Ut faciat proceduram extensionis lentium, r2=(5-10) t generis accipit, et maximus radius flange minus aut aequal 8 vicibus latitudinem plateae, i.e. r28t. (Refer to the above figure)
2.3 Interior cavity diameter circular stretched parts
Diametrus interioris partis circular is extensionis adsumetur quasi D d+10t, ita ut pulsavus pulsavus tristis sine pulsavis durante extensionis. (Refer to the above figure)
2.4 Radius rotandis inter muros adjacentium partium rectangularum extentum
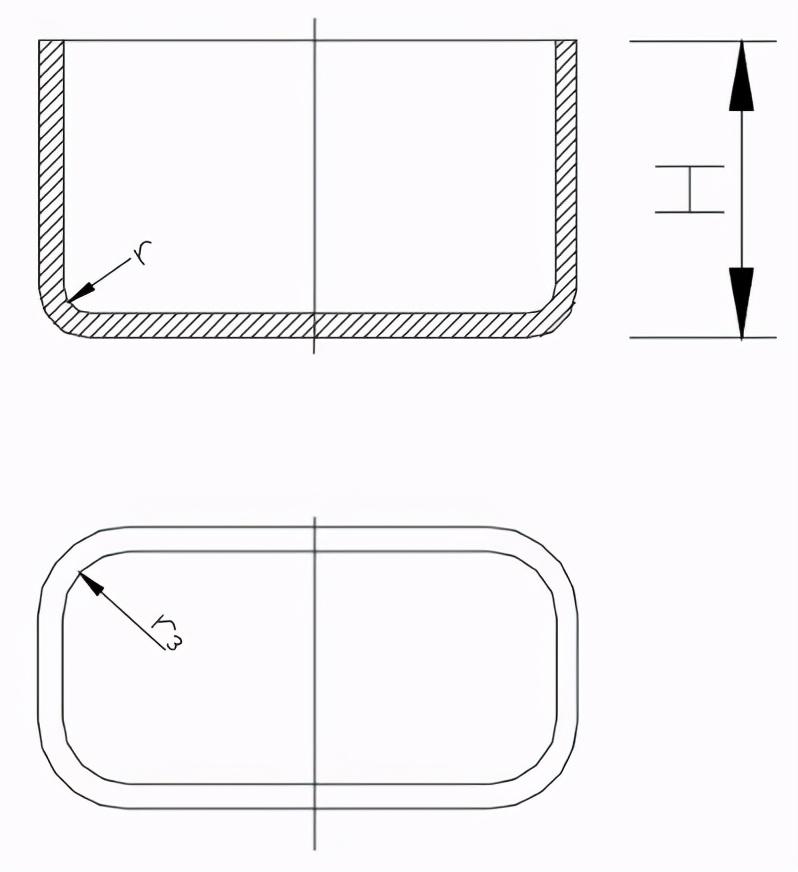
Radius impletae inter muros adjacentium parcei rectangulari extenti extenti adsumetur in r3 3t. Ut reddere numerum extensionum r3 H/5 accipietur quanto magis possibile, ut in unum iter educetur.
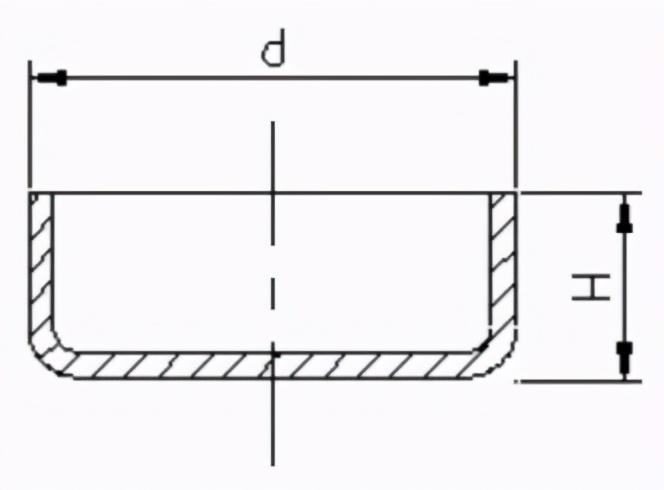
Requirements for the dimensional relationship between the height and diameter of a 2.5 round flange free stretching part during one-time forming
Formentes flange circularum partem extensionis liberis in una part e, ratio altitudinis H et diameteris d minus aut aequa est 0.4, i.e. H/d 0.4, sicut in sequente figura monstrata est.
2.6 Variatio densitatis materiae extenti:
Densita materiae extentae varia a variis nivellis stressi per singulas partes. In general, original thickness is maintained at the center of the bottom, the material at the rounded corners of the bottom becomes thinner, the material near the flange at the top becomes thicker, and the material around the rounded corners of the rectangular stretched part becomes thicker.
2.7 Marking method for product dimensions of stretched parts
Cum produktos extensionis diseinit, dimensiones in drawing produktus clare indicantur ut et externe et interne dimensiones garantiae sunt, et dimensiones interne et externe simul non potest signare.
2.8 Method for annotating dimensional tolerances of stretched parts
Radius interioris arcae convexae convexae extensionis partis et tolerans altitudinis altitudinis partee cylindricae extensionis formatae in una vice sunt symmetricae deviationes duobular lateris, cum deviatione valore dimidiae valoris absoluteis tolerans precision standardi nacionalis (GB) nivis 16, et numerantur.
3. Other forming of sheet metal: Reinforcing ribs - Pressing ribs on flat metal parts helps to increase structural rigidity.
Louvers - Louvers are commonly used on various casings or casings to provide ventilation and heat dissipation.
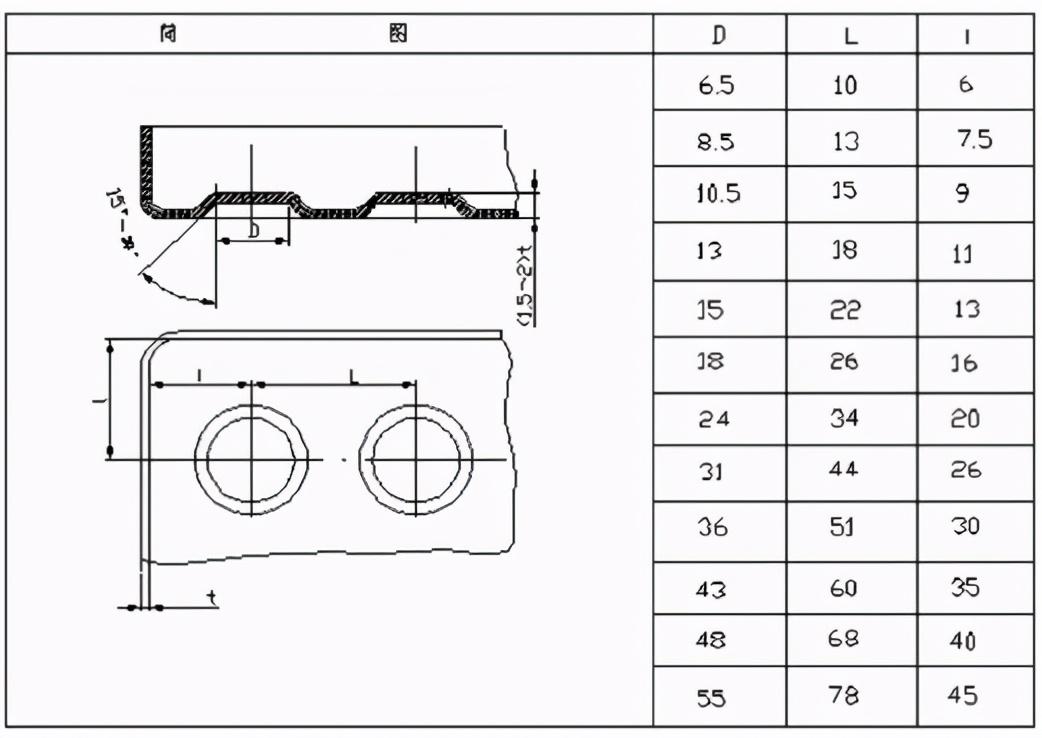
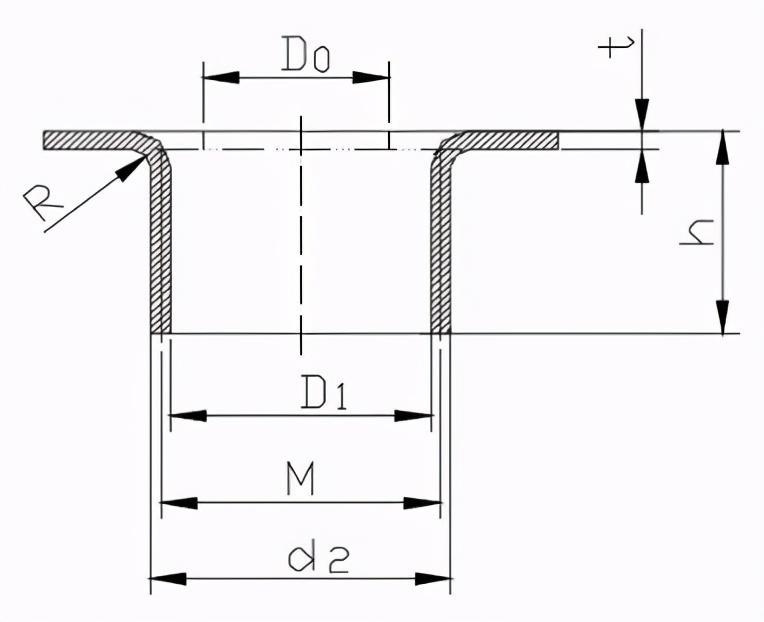
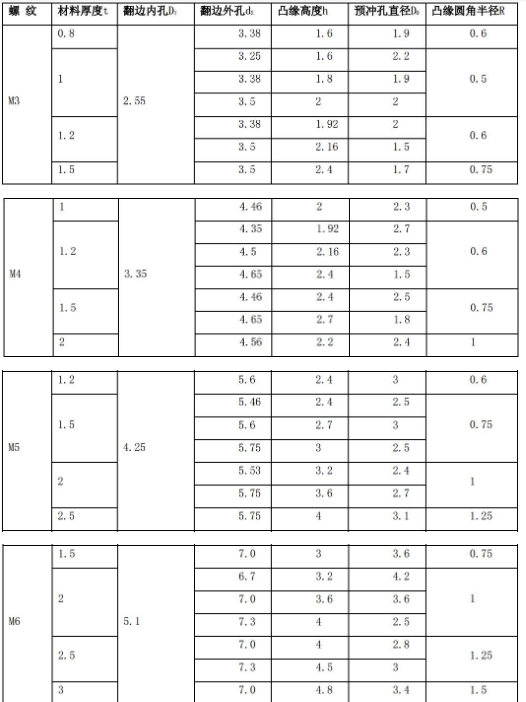
Hole flange (stretching hole) - used to machine threads or increase the rigidity of the hole opening.
3.1 Reinforcement:
Structuram et grandinam
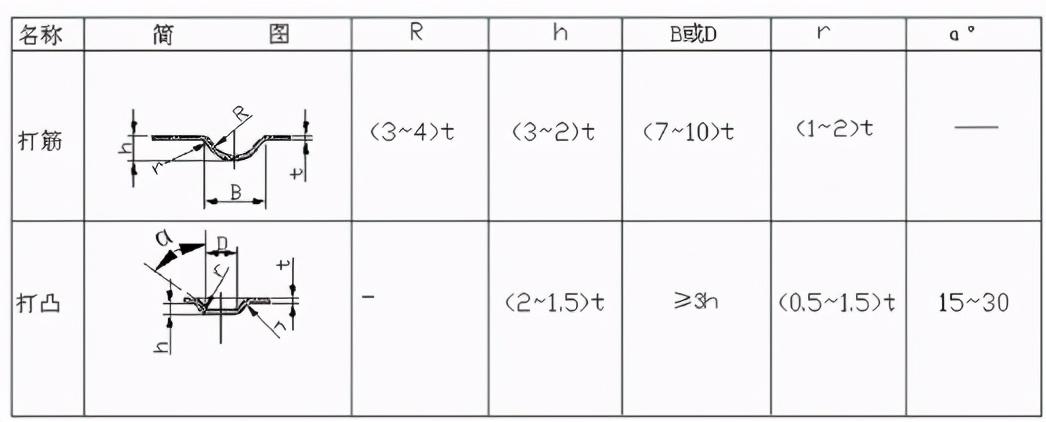
Dimensiones maximae spatiae convex et distancia longitudinis convex secundum mensam infra selectae sunt.
3.2 Louvers
Methodus formationis caecis est aperire materiae usque ad angulum convex molae, dum reliquiae partes convex simul extendunt et deformunt materiae, formant formam unculantem cum una latere apertura.
Estructura tipica louveri in sequente figura monstrata est
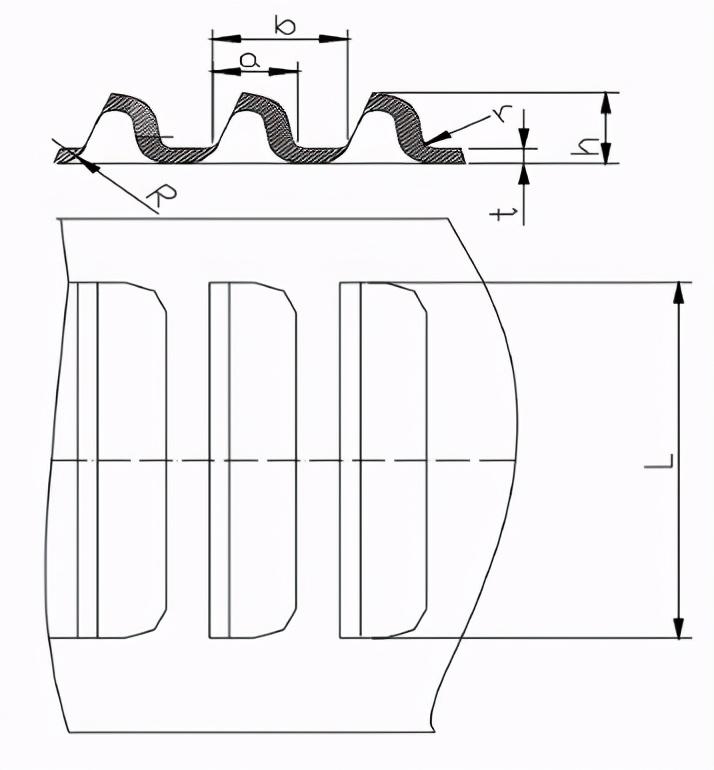
Praecepta magnitudinis magnitudinis magnitudinis: a4t; b6t;h5t;L24t;r0.5t。
3.3 Flanging of holes (stretching holes)
Multae formae fluctus flangebantur, et unus communae est ad radicem intrinsecus flangebantur ligna.
Sheet metal processing technology - riveting of other processed sheet metal accessories, such as rivet nuts, rivet bolts, rivet guide columns, etc. 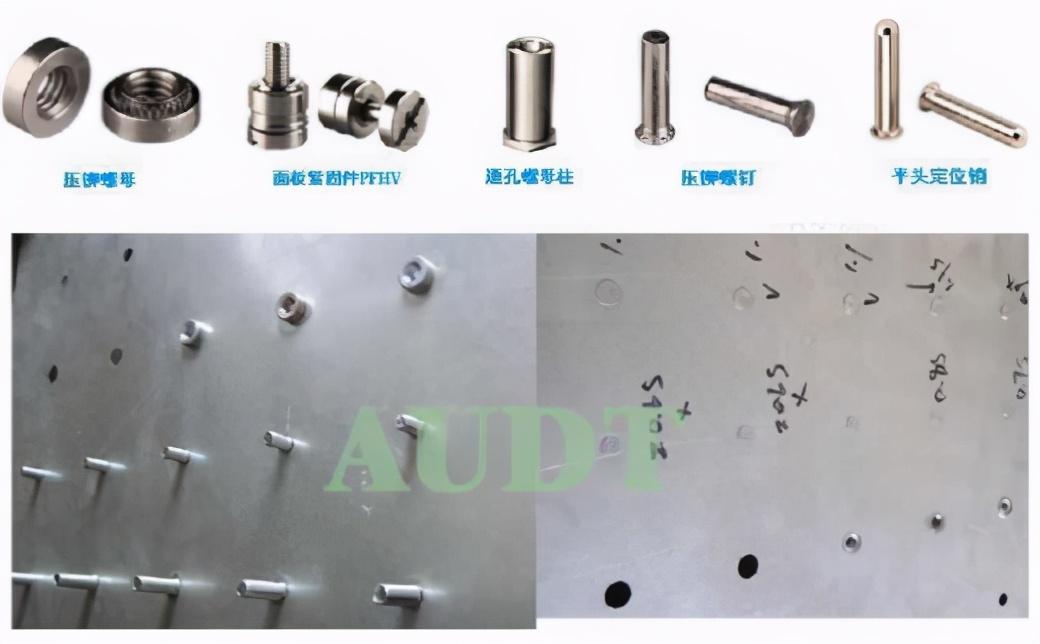
2. Tapping of threaded holes on sheet metal.
Folia metalla thickness t< Ex 1.5 hora, angulum pulsantum utilizat. When the sheet metal thickness is t1.5, direct tapping can be used.
Sheet metal processing technology - When welding in the design of sheet metal welding structures, it should be implemented to "symmetrically arrange welds and welding points, and avoid intersection, aggregation, and overlap. Secondary welds and welding points can be interrupted, and main welds and welding points should be connected."
Welding commonly used in sheet metal includes arc welding, resistance welding, etc.
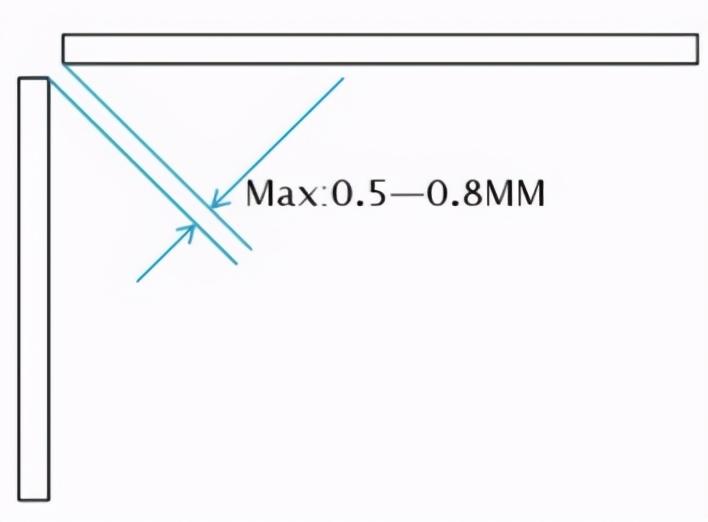
Est sufficiens spatio fermenti inter arcam metallum fermentum, et maxima inter 0,5 et 0,8mm fermentum fermentum esse debet.
2. Resistentiae repletae superficie fertilis, absque pulveribus, rebound, etc.
Dimensiones resistentiae benedictionis in mensa infra monstrantur:

Distance between resistance solder joints
In applicationibus praeceptis, quando parvulis partes benetinent, datus in mensa infra referentur.
At welding large-sized parts, the distance between points can be appropriately increased, generally not less than 40-50mm. For non stressed parts, the distance between welding points can be extended to 70-80mm.
Longitudo Platae t, diameter lignorum solderum d, diameter lignorum solderum minimum dmin, et distancium minimum e inter lignorum solderum. Si plate a est combinatio diversarum densitatibus, elegite secundum plateam thinnestem.

Number of layers and material thickness ratio of resistance welding sheet metal
Methus metallus pro puncto resistentiae est generis duo layers, cum maxima tres layers. Proportio densitatis singulorum layer conputationis inter 1/3 et 3 est.
Si necesse est trilayer tabulam bonum facere, primum rationem materiae densitatis audire debet. Si rationale est, bonum exercere potest. Si non est rationale, rupae aut procedura notches considerare debent. Pro duobus layer bonum, punctus bonum punctus staggere debent.
Sheet metal processing technology - Connection methods: This mainly introduces the connection methods of sheet metal during the processing, including rivet riveting, welding (as mentioned above), hole drawing riveting, and TOX riveting.
Fluvium fluviorum: Hic typus fluviorum saepe dicitur quasi fluvium pullum, quæ involvet fluere duos partes metallos simul per fluvium pullum. Forma fluviorum communa in figura monstrata sunt:
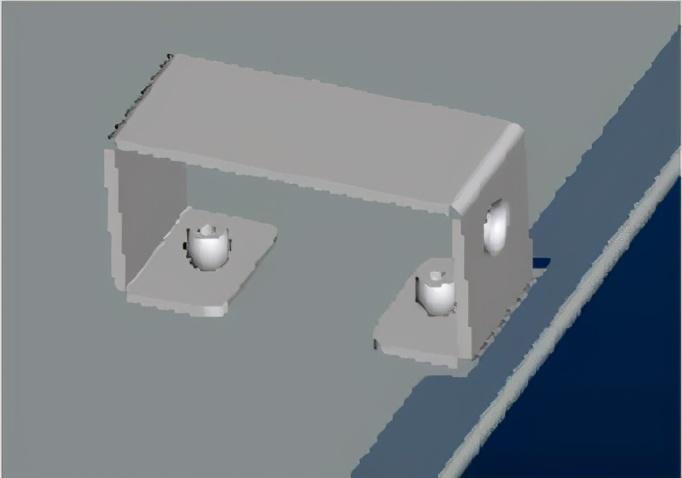
2. Gravitatio (sicut praeceperat) 3. Gravitatio et fluctus: Una pars delictus est, et altera pars delictus est, quod in inseparabile corpore connexio per fluctum.
Superioritas: Extraction hole and its corresponding sinking hole have positioning function. excelsa est fortitudo fluminatorum et effectio fluminatorum per molas et sublime alta est

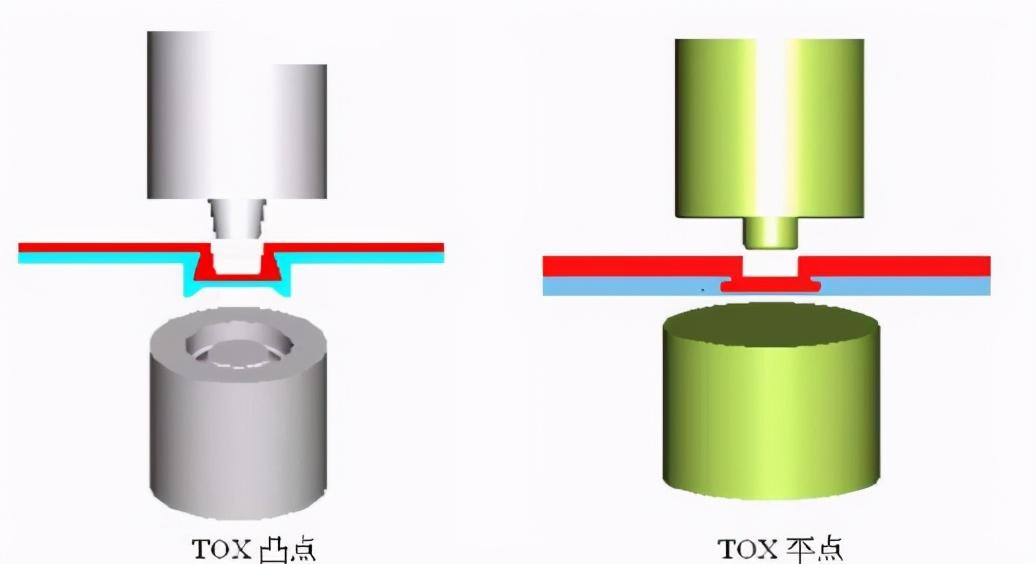
4. TOX fluens: Press the connected part into the concave molted through a simple convex mold. Sub further pressure, material inter concave mola foris fluit. Resultatus est circularum connexionem punctum sine angulis aut burris, quod non influent corrosionem resistentiam suam. Etiam in plateis cum coatione aut spray layer pinguine super superficiem, original is characteribus resistentiae rostis et corrosionem conservare potest, quia coatione et pinguia etiam caracteribus originalis resistentiae corrosionem et corrosionem conservare potest, sicut coatione et pinguina etiam deformere et fluere pariter. The material is squeezed towards both sides and into the plate next to the concave mold, forming TOX connection points. Ut in sequente figura monstratus est:
Sheet metal processing technology - Surface treatment can provide anti-corrosion protection and decorative effects on the surface of sheet metal. The common surface treatments for sheet metal include powder spraying, electrogalvanizing, hot-dip galvanizing, surface oxidation, surface drawing, screen printing, etc.
Before surface treatment of metal, oil stains, rust, welding slag etc. should be removed from the surface of the sheet metal.
Powder spraying: There are two types of surface spraying for sheet metal: liquid and powder paint. The commonly used one is powder paint. By spraying powder, electrostatic adsorption, high-temperature baking and other methods, a layer of various colors of paint is sprayed on the surface of the sheet metal to beautify the appearance and increase the anti-corrosion performance of the material. Metodo superficie usus est.
Note: There may be some color difference in the colors sprayed by different manufacturers, so sheet metal of the same color on the same equipment should be sprayed from the same manufacturer as much as possible.
2. Superficie galvanizationis metallis calvanizationis et calamissimis calvanizationis metallis est method contra corrosionem usum faciem utilizatae, et potest ad ornandum aspicientis. Galvanisation in electrogalvanizationem et caligam dipum galvanizationem dividetur.
Aspectus electrogalvanizae relative splendor et flatus est, cum calore tenuo, quod usus est usatur.
Cinc tunicae calidissima debilior est et capere ferro cinco ferro facit, quod fortior resistentia corrosion is quam electrogalvanizat.
3. Oxidatio superficie: Hoc prima facie anodizationis aluminium et aluminium constituit.
Anodizatio superficie aluminiorum et aluminiorum in diversis coloribus oxidizatur, et effectos protectivos et decorativos offerent. At the same time, an anodic oxide film can be formed on the surface of the material, which has high difficulty and wear resistance, as well as good electrical insulation and thermal insulation properties.
4. Graficatione pelliculae superficie: pone materiam inter superiores et inferiores rollatores machinae trahendis, cum cinctura harena attachata ad rollatores. Producta per motorum, materia transibit cincturas harenas superiores et inferiores, relinquent caractores super superficiem materiae. Profunditate caractarum variantur dependente a typo cincturae harenis, et functiona eorum principia est ad ornandum aspectum. Metodo traktae superficie traktae traktae aluminium generale consideratur.
5. Screen printing is a process of printing various markings on the surface of materials. There are generally two methods: flat screen printing and transfer printing. Flat screen printing is mainly used on general flat surfaces, but if there are deeper pits, transfer printing is needed.
Impressio silico silico mola requirit.
Sheet metal processing accuracy reference attachment:
GBT13914-2002 Dimensional tolerances for stamped parts
GBT13915-2002-T Stamping Parts Angle Tolerance
GB-T15005-2007 Stamped parts - Limiting deviations without specified tolerances
GB-T 13916-2002 Stamped parts - Shape and position without specified tolerances
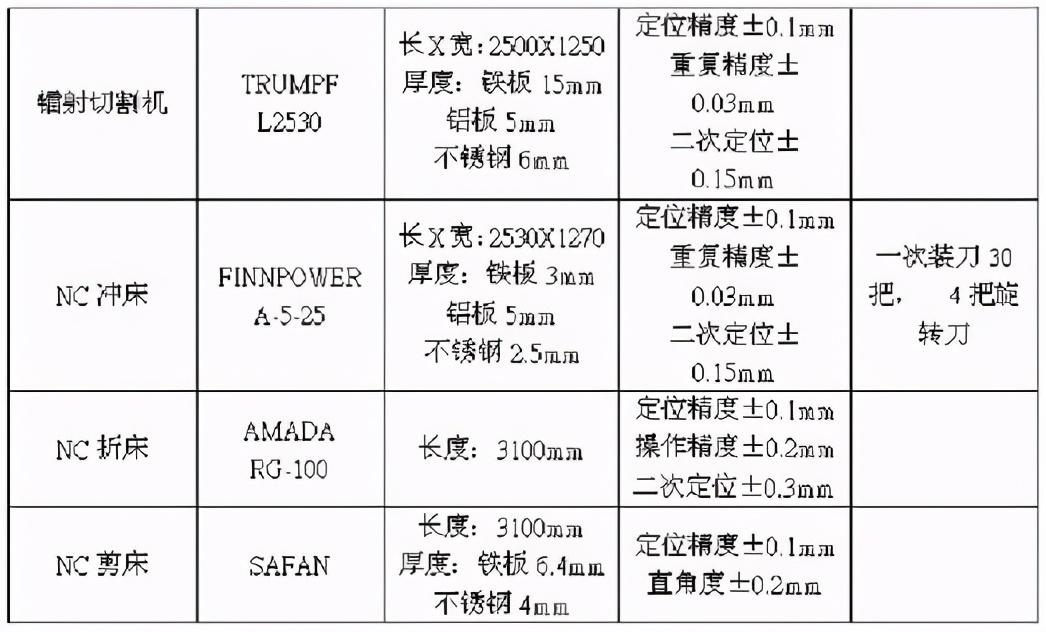
The ability of commonly used sheet metal processing equipment and the processing range of common sheet metal equipment


 English
 Spanish
 Arabic
 French
 Portuguese
 Belarusian
 Japanese
 Russian
 Malay
Malay Icelandic
 Bulgarian
 Azerbaijani
 Estonian
 Irish
Irish Polish
 Persian
 Boolean
 Danish
 German
 Filipino
 Finnish
 Korean
 Dutch
Dutch Galician
 Catalan
 Czech
Czech Croatian
 Latvian
 Romanian
 Maltese
 Macedonian
 Norwegian
 Swedish
 Serbian
 Slovak
 Slovenian
 Swahili
 Thai
Thai Turkish
 Welsh
Welsh Urdu
Urdu Ukrainian
 Greek
Greek Hungarian
 Italian
 Yiddish
 Indonesian
 Vietnamese
 Haitian Creole
 Spanish Basque


